Provisioning a Portal
Provisioning is the one-time setup that turns a stock Meta Portal into an Immortal device. You plug the Portal into a computer with a USB-C cable, double-click one file, and tap Allow once on the Portal — the kit does the rest. It's a single per-device step, and everything it does is reversible.
The short version
- Download the kit and open the
provisioningfolder. - Unblock the files (first time only).
- On the Portal, enable Settings → Debug → ADB Enabled.
- Connect the Portal over USB-C.
- Double-click
Provision-Portaland tap Allow on the Portal. - Wait for "Done." — the Portal switches to the Immortal home screen.
No technical skills required
You don't need a terminal, and you don't need to install Android developer tools. If adb
isn't on your computer, the kit downloads Google's official platform-tools automatically.
It also fetches the latest Immortal release on its own, so there's no separate app file to
download.
What you'll need
- A Meta Portal (any model — Portal, Portal+, Portal Go, Mini, or Portal TV).
- A computer running macOS or Windows. (Linux works too — use the
.command/.shfiles.) - A USB-C cable that carries data — not a charge-only cable. This is the single most common snag; see Troubleshooting.
- About 10 minutes.
Step 1 — Download the kit
The provisioning kit lives in the repository's provisioning/ folder. To get it:
- Go to the Immortal repository.
- Click the green Code button → Download ZIP (or, on the Releases page, download Source code (zip) under the latest release).
- Unzip it and open the
provisioningfolder.
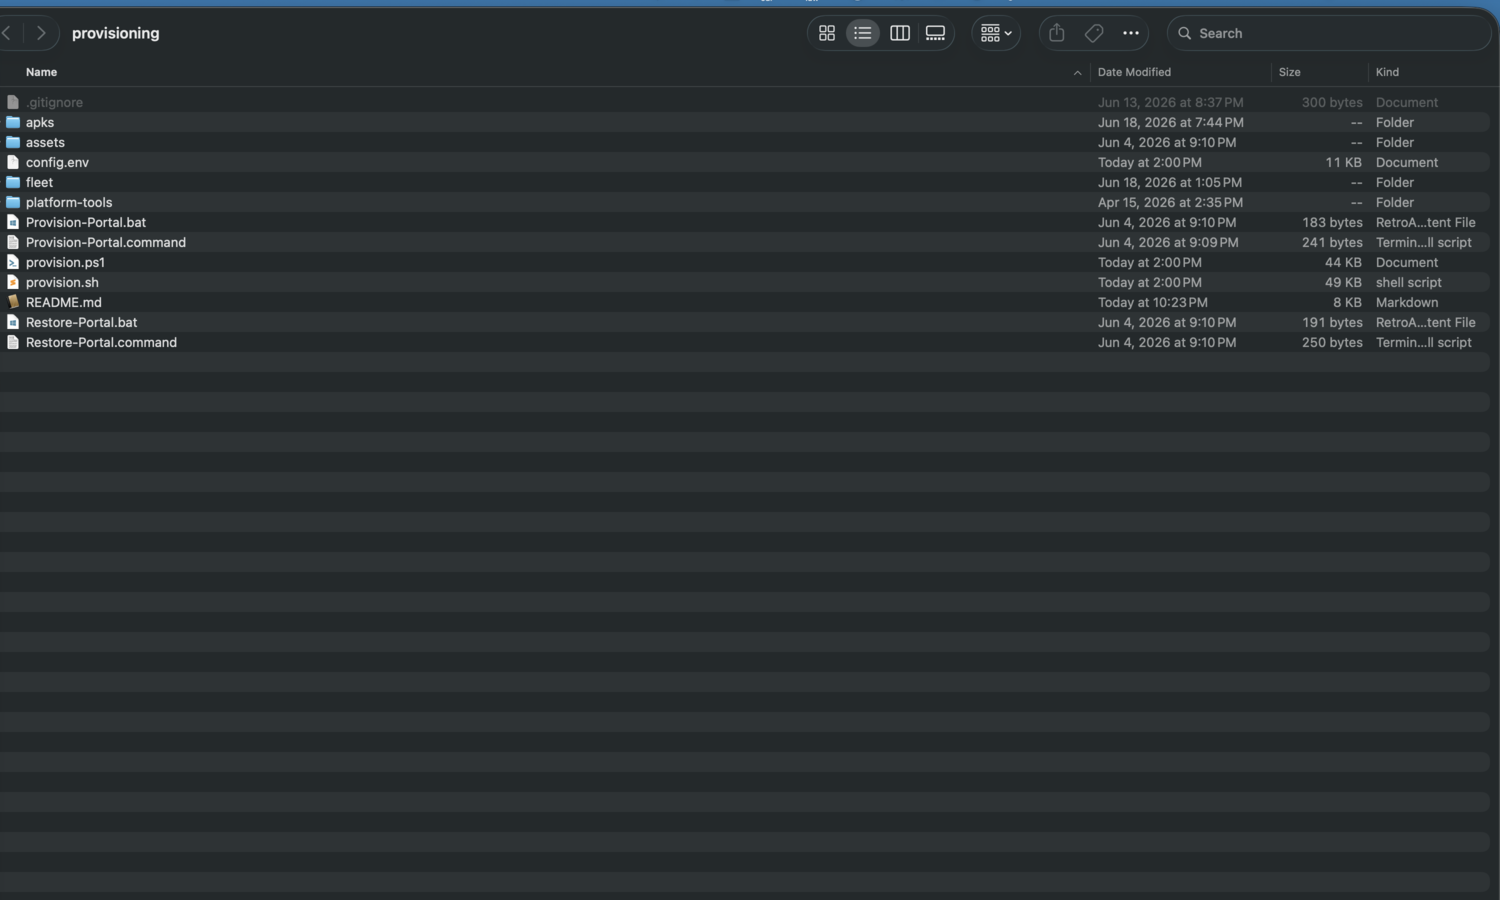
Inside you'll find:
| File | What it's for |
|---|---|
Provision-Portal.command (macOS/Linux) |
Double-click to provision |
Provision-Portal.bat (Windows) |
Double-click to provision |
Restore-Portal.command / .bat |
Double-click to undo |
config.env |
Optional settings (sensible defaults — most people never touch it) |
Step 2 — Unblock the files (first time only)
Operating systems flag files downloaded from the internet. Clear that once:
macOS may say the file is "from an unidentified developer" or "cannot be verified".
- Easiest: right-click
Provision-Portal.command→ Open → Open again. You only do this the first time. - If macOS still refuses, go to ** → System Settings → Privacy & Security, scroll down, and click Open Anyway**.
-
Or clear the quarantine flag in one go (Terminal, inside the folder):
Windows marks downloaded files as blocked, which makes the script error out or flash and close immediately.
- Easiest: right-click the
provisioningfolder → Properties → tick Unblock at the bottom → OK. -
Or, in PowerShell from inside the folder, unblock everything at once:
Step 3 — Enable ADB on the Portal
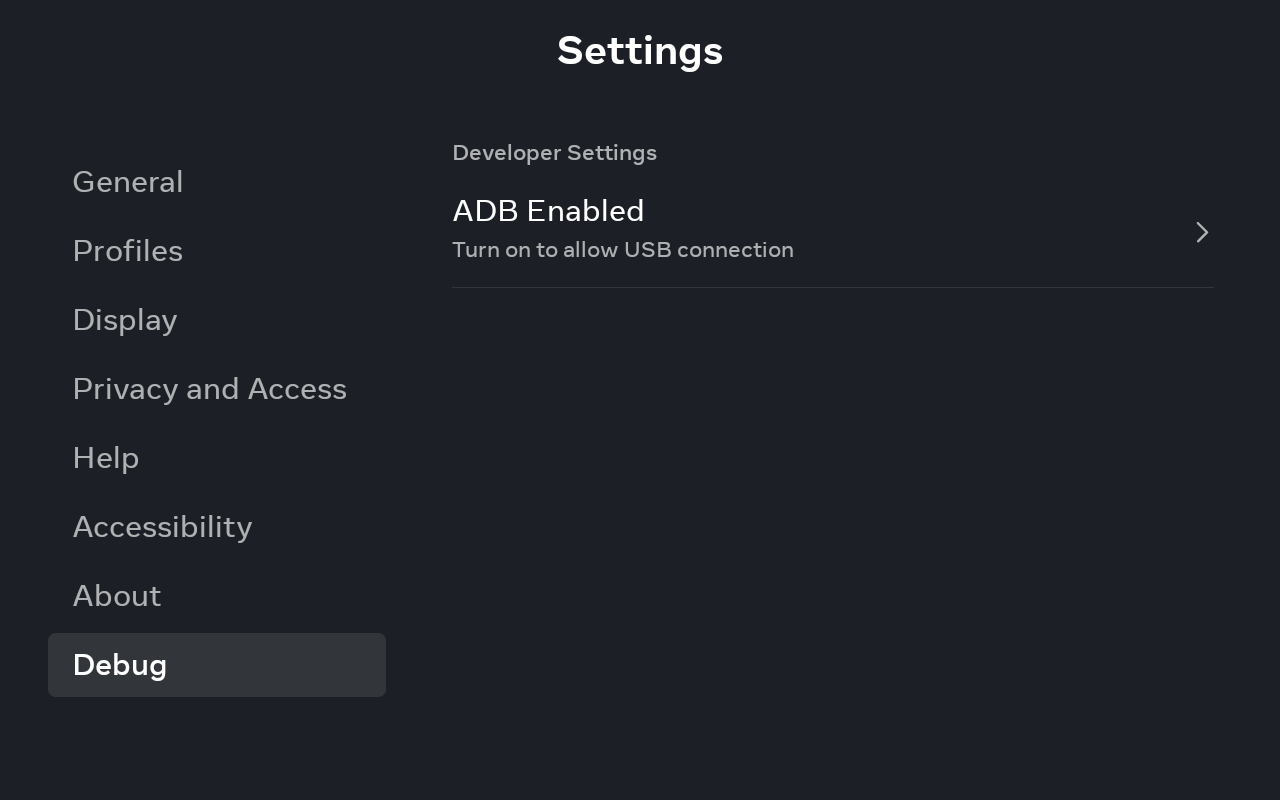
On the Portal itself, open Settings → Debug → ADB Enabled and turn it on. This lets the computer talk to the Portal over the cable.
Can't find the Debug menu?
The exact path varies slightly by model and software version — look under Settings for Debug, Developer, or System. It's a one-time toggle; once on, it stays on.
Step 4 — Connect the Portal
Plug the Portal into your computer with the USB-C data cable. Nothing needs to happen on screen yet.
Step 5 — Run it
Double-click the file for your OS:
Double-click Provision-Portal.command. A Terminal window opens and prints each step as it
runs.
Double-click Provision-Portal.bat. A console window opens and prints each step as it runs.
A console window scrolling through steps like Installing client APK, Granting permissions, and Setting launcher is normal — leave it running.
Within a few seconds, the Portal shows a "Allow USB debugging?" prompt. Tap Allow, and tick "Always allow from this computer" so you won't be asked again.
Step 6 — Answer the questions it asks
Most of the run is automatic, but it may pause to ask a few things (just type your answer and press Enter):
| Prompt | What it means | Suggested answer |
|---|---|---|
| Block Meta OS updates? | Stops a future Meta update from silently undoing your setup. The Portal is discontinued, so you give up only unlikely future patches. | Yes (default) |
| Restore Amazon Alexa? (first-gen only) | Revives the original Alexa client. The always-on "Hey Alexa" wake word installs by default and yields the mic during calls; opt out per-device with INSTALL_ALEXA_WAKE_WORD=false. See the Alexa & voice guide. |
Your call — y to set up Alexa |
Device name (only with --fleet) |
A friendly name for fleet management, e.g. "Living Room". | Whatever you like |
If you don't want to be asked at all, you can preset these in config.env (see
Customising).
Done — and how to check it worked
When you see "Done.", provisioning is complete. The Portal should switch to the Immortal home screen, and its screensaver becomes the Immortal photo frame.
To double-check at any time, you can run a status report:
That prints the current home screen, screensaver, install state, and which client app is set.
First-gen Portal+ and Portal TV
On these Android 9 models the kit also repairs the broken installer dialog automatically, and the fix survives reboots — so the App Store and sideloading just work afterward. Details: First-gen Portals.
That's it — the cable is no longer needed. From here Immortal installs and updates apps on its own, and updates itself over the air.
Troubleshooting
Nothing happens / 'no devices found' / 'device not found'
In order of likelihood:
- Charge-only USB cable. Many USB-C cables only carry power. Swap to one you know transfers data (e.g. the one a phone came with).
- ADB isn't enabled on the Portal — see Step 3.
- Re-seat the cable at both ends, and try a different USB port on the computer.
'unauthorized' or the run stops waiting
You didn't approve the "Allow USB debugging?" prompt on the Portal. Unplug and replug the cable, watch the Portal screen, and tap Allow (tick Always allow). Then re-run.
macOS: 'cannot be opened because it is from an unidentified developer'
Right-click the file → Open → Open. If macOS still blocks it, go to System Settings → Privacy & Security → Open Anyway, or clear the quarantine flag — see Step 2.
Windows: the window flashes and closes, or shows a parsing error
The downloaded files are still blocked. Unblock them (Properties → Unblock, or
Get-ChildItem -Recurse | Unblock-File) — see Step 2.
'adb not found' and it can't download tools
The kit downloads Google's platform-tools automatically, so this usually means no internet
access (or a restrictive network/proxy) on the computer. Connect to a normal network and
re-run, or install Android platform-tools manually so adb is on your PATH.
It finished, but the Portal didn't change to the Immortal home
Re-run provisioning. If you intentionally set SET_LAUNCHER=false, Immortal installs as a
normal app instead of the home screen — open it from the stock home.
More than one Android device is connected
The kit expects a single Portal. Disconnect other phones/tablets and re-run.
Restoring
To undo everything, double-click Restore-Portal (.command / .bat), or run
./provision.sh --restore. It puts the original launcher and screensaver back, re-enables the
package verifier and OS updates, and re-enables the first-gen installer overlay.
The Immortal app itself is left installed (remove it with adb uninstall com.immortal.launcher if
you want). Some screen-off device-admin removal has to be finished on the Portal — restore tells
you exactly when and how, rather than pretending it did something Android won't allow from a script.
Customising and advanced
Most people never need this — the defaults are sensible. But every step is configurable in
config.env:
| Setting | Default | What it does |
|---|---|---|
SET_LAUNCHER |
on | Replace the system home with Immortal (reversible). |
SET_SCREENSAVER |
on | Set Immortal's photo frame as the screensaver. |
DISABLE_VERIFIER |
on | Disable Meta's package verifier, which otherwise blocks on-device installs. |
DISABLE_INSTALLER_OVERLAY |
on | Fix the Gen-1 white-on-white installer dialog. API < 29 only. |
DISABLE_OTA |
ask | Block Meta OS updates so an OTA can't undo the setup. |
| Shizuku | installed | Privileged broker — useful for Aurora's silent installs. |
BOOT_APPS |
MA player | Apps to relaunch after a reboot (also editable in Settings → Start on boot). |
ENABLE_FLEET |
off | Opt-in always-on WiFi management agent. |
On the first run the kit snapshots the device's real stock launcher and screensaver to
/sdcard/immortal_restore.env, so --restore puts the correct components back on any Portal model.
Command-line flags
./provision.sh                 # full provision (default)
./provision.sh --status        # report current home / screensaver / install state
./provision.sh --restore       # undo everything
./provision.sh --overlay-fix   # apply just the Gen-1 dialog fix
./provision.sh --apps          # run only the "pre-install apps" step
./provision.sh --shizuku       # (re)start the Shizuku server
./provision.sh --fleet         # enable the WiFi fleet agent on this device
./provision.sh --alexa         # restore Alexa (first-gen) — see the voice guide
./provision.sh --update-hey    # refresh just the "hey" wake-word app to the latest release
./provision.sh --wifi-adb      # enable raw adb-over-WiFi on demand
On Windows the same flags are PowerShell switches, e.g. provision.ps1 -Status, -Restore,
-OverlayFix.
In-kit reference
The kit ships its own
provisioning/README.md
with the same details for people who only have the downloaded folder in front of them.